


ComfyUI for Beginners: Build Your First AI Video Pipeline Step-by-Step

ComfyUI is rapidly becoming the go-to platform for hands-on AI video generation workflows. Unlike black-box, one-click video generators, ComfyUI gives you full control. Its node-based system lets developers, creators, and AI enthusiasts build custom pipelines for anything from text-to-video to image-to-video projects. If you've seen the hype around tools like Veo or Seedance and want to understand *how* these workflows happen, you're in the right place. In this guide, we'll build a basic AI video pipeline in ComfyUI step-by-step. By the end, you'll know how node-based AI workflows work, why they're powerful, and how to get started—plus, I'll show you how browser-based platforms like TimrX can make things even easier.
What Is ComfyUI?
ComfyUI is an open-source, node-based interface for generative AI workflows. Instead of clicking through menus or writing scripts, you drag, connect, and configure nodes—like building with Lego for AI. Each node is a discrete processing step: input, generation, transformation, output. Compared to traditional tools that hide the pipeline behind a 'generate' button, ComfyUI exposes every piece of the process. For developers, this means total flexibility. You can swap out models, chain different AI tasks, and debug each step visually. In my experience, it's the best way to learn how AI video generation actually works (and why things sometimes break).
How AI Video Generation Works
The core of modern AI video generation is a pipeline: you start with a text prompt or image, generate a base frame, then build motion and temporal consistency into a sequence of images—finally stitching them together into a video. Most pipelines use diffusion models for generating and refining images, then add motion using interpolation or dedicated models. Text-to-video AI pipelines (like Veo or Seedance) have become extremely popular because they can generate short, cinematic clips from a single prompt. But the real magic is in the details: keeping frames coherent, managing motion between images, and exporting to standard video formats. ComfyUI lets you build and tune each of these steps yourself.
Understanding Nodes in ComfyUI
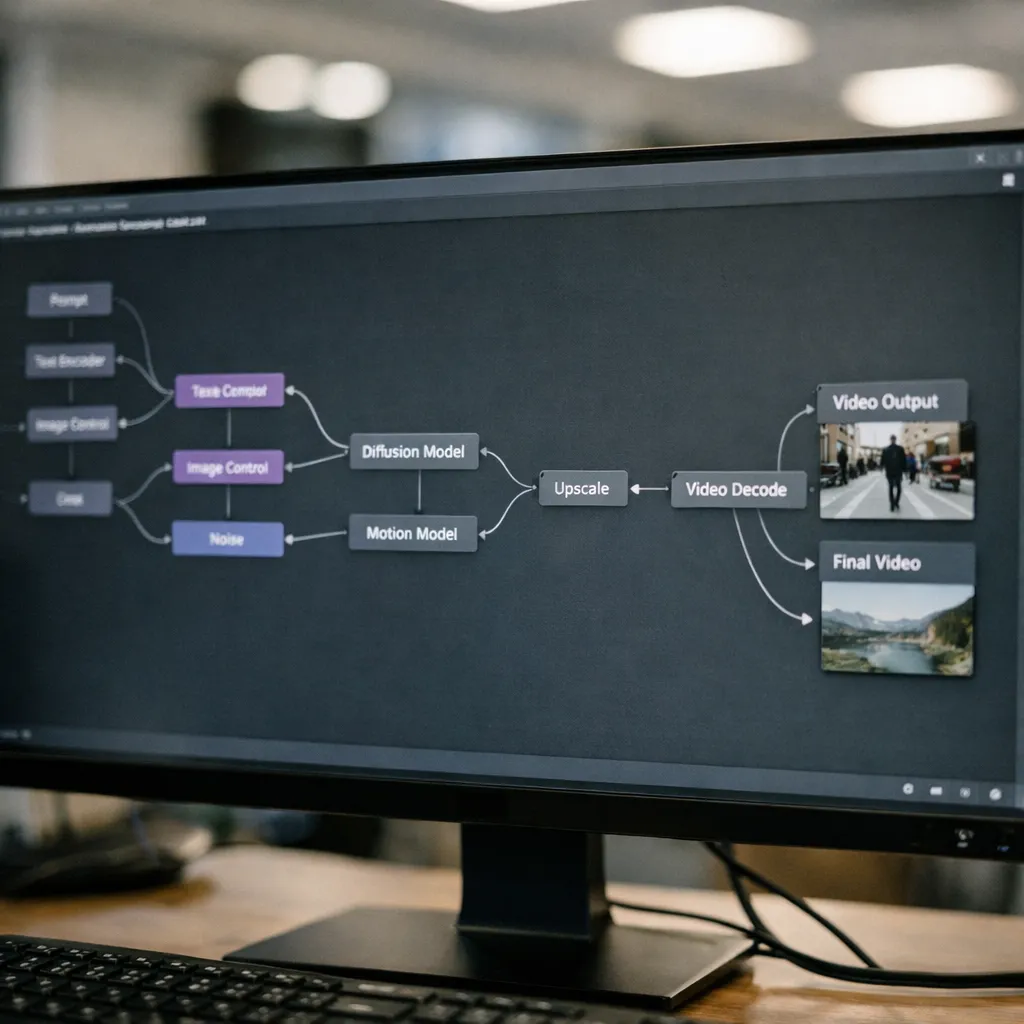
The node graph is the heart of every ComfyUI workflow. Each node has a specific role, and you connect them to form your pipeline. Here’s how it breaks down:
Input Nodes
Input nodes start the pipeline. They can be text prompts (for text-to-image or text-to-video), image uploads (for image-to-video), or even parameter sliders. For example, you might use a Text Prompt Node to describe a scene: 'a futuristic city at night, cinematic lighting, slow camera pan.'
Processing Nodes
Processing nodes handle the heavy lifting. These include diffusion model nodes (which convert prompts/images into frames), transformation nodes (for resizing, color grading, or motion), and interpolation nodes (for generating in-between frames to create smooth motion). This is where most of the configuration happens—model selection, seed, guidance scale, and so on.
Output Nodes
Output nodes take the processed frames and export them as images or videos. You’ll set parameters like FPS, video resolution, and output format. The last node in your graph is typically a Video Output Node, which assembles all generated frames into a single video file.
Setting Up ComfyUI
Installation is straightforward if you're familiar with Python and AI tools. You'll need Python 3.10+, Git, and a GPU (NVIDIA CUDA preferred) for real-time video generation. It's technically possible to run ComfyUI on a CPU, but it will be *painfully* slow for anything beyond low-res images. Most workflows require a modern GPU with at least 8GB VRAM. Here's the quick setup:
- Clone the ComfyUI GitHub repo
- Install dependencies with pip (torch, torchvision, etc.)
- Download pre-trained models (Stable Diffusion, motion modules)
- Launch the UI with `python main.py`
If you want a visual walkthrough, TimrX also offers a blog section with setup guides for similar AI tools. For a deeper look at platform capabilities, check out our main hub or archive for step-by-step resources.
Build Your First AI Video Pipeline (Step-by-Step)
Let's walk through a basic AI video pipeline in ComfyUI. This is the fastest way to learn how to use ComfyUI and see real results.
Step 1 — Add Prompt Input
Drag a Text Prompt Node onto the canvas. Enter your scene description—be specific. For example: 'A futuristic city at night, cinematic lighting, slow camera pan.' If you want to start from an image, use an Image Input Node instead.
Step 2 — Generate Base Image
Connect your prompt node to a Text-to-Image Node (usually a Stable Diffusion node). This generates your first frame. If using an image, connect to an Image-to-Image Node for style transfer or initial frame generation.
Step 3 — Add Motion / Animation
Add an Interpolation Node or a Motion Model Node. This creates additional frames by morphing or moving the initial image. You can adjust parameters like motion strength, direction, and number of frames. Some pipelines use optical flow or dedicated video diffusion models for more advanced motion.
Step 4 — Configure Video Output
Connect the output of your motion node to a Video Output Node. Set FPS (frames per second), duration, and video resolution. Typical values: 24–30 FPS, 5–10 seconds duration, 720p or 1080p resolution if your GPU allows.
Step 5 — Export Video
Click 'Run' or the equivalent in ComfyUI. The node graph will process each step, generate frames, and export your final video. You'll find the result in your output folder. If you hit errors, check node connections and model paths.
For detailed prompt tips, see How to Write Better AI Image Prompts — Complete Guide.
Example Workflow
Let's say you want: 'a futuristic city at night, cinematic lighting, slow camera pan.' Here's how the nodes flow:
- Text Prompt Node (your scene description)
- Text-to-Image Node (generates first frame)
- Motion/Interpolation Node (generates motion frames)
- Video Output Node (exports video clip)
Each node passes its output to the next. If you want to customize the camera movement, tweak the motion node's parameters. For a more advanced take, you could add color grading or post-processing nodes before the output.
If you want to compare how other tools handle similar workflows (like Seedance or Veo), check out Why AI Video Generation Is Booming in 2026: Veo 3.1, Seedance 2.0, and the New Creator Workflow.
Common Mistakes
- Broken node connections (double-check inputs/outputs)
- Incorrect model selection (wrong checkpoint or missing model files)
- Running out of VRAM (lower resolution or frame count)
- Overcomplicated graphs (start simple, add complexity gradually)
I've seen new users try to build 'everything-at-once' graphs and get stuck. Start with a minimal pipeline, get it working, then add features node by node.
Limitations of ComfyUI
- Initial setup can be intimidating (Python, models, dependencies)
- Needs a powerful GPU for practical video generation
- Learning curve for node system and model parameters
- No built-in browser interface—runs locally
If you're a developer who loves to tinker, the flexibility is worth it. But for creators who just want results, setup and hardware can be a real barrier.
Alternative: Browser-Based AI Video with TimrX
Here's the thing—browser-based AI video generation is catching up fast. Platforms like TimrX offer node-based and prompt-driven video workflows, but you don't have to install anything or worry about GPU specs. Just visit the AI Video Generator page, enter your prompt, and generate. You get access to state-of-the-art models, image-to-video, and even 3D pipelines. Want to explore? See the AI Image Generator or 3D print model generator for cross-modal workflows. For full feature breakdowns, check TimrX AI Platform: Features, Updates, and Creative Capabilities.
Compared to ComfyUI, TimrX is much more accessible for beginners. No setup. No VRAM headaches. You get fewer low-level controls, but for 95% of use cases, that's actually a plus.
AI Video Workflows Beyond ComfyUI
The AI video space is moving quickly. Prompt-to-video tools (like Seedance 2.0), image-to-video pipelines, and integrated platforms now let you generate cinematic clips, stylized loops, and even 3D animations—all from a browser. If you're curious about how these tools compare, see Best AI Video Tools 2026 — Full Comparison or Generate Videos, Images, and 3D Models with AI: Inside the TimrX Platform.
Future of AI Video Pipelines
Here's where things are headed: real-time AI video generation, better motion coherence (no more weird frame warping), and unified pipelines that handle text, images, and 3D together. We're already seeing early signs with cross-modal platforms like TimrX, where you can chain text-to-image, video, and 3D model generation in a single workflow. The gap between developer-focused tools like ComfyUI and browser platforms is closing fast.
Conclusion
You now know how to use ComfyUI to build your first AI video pipeline, from prompt to final export. Node-based AI workflows give you full control and transparency, which is why developers (myself included) keep coming back. That said, for creators or anyone who wants to skip complex installs, browser-based tools like TimrX are the best entry point—no hardware headaches, just creative results. My advice: experiment with both. Start with ComfyUI if you want to understand the guts of AI video generation. Use TimrX when you want to move fast and explore what's possible across images, video, and even 3D. For more tutorials and workflows, check our blog and archive.
FAQ
What is ComfyUI used for?
ComfyUI is used to build custom AI image and video generation pipelines using a node-based interface. It's great for experimenting with different models and workflows.
Can ComfyUI generate videos?
Yes, ComfyUI supports AI video generation by chaining nodes for text/image input, motion, and video export.
Is ComfyUI beginner-friendly?
ComfyUI is beginner-friendly for those with some technical background, but the setup and node graph can be intimidating for complete beginners.
What are nodes in ComfyUI?
Nodes are building blocks in ComfyUI. Each node performs a specific task—input, processing, or output—in your AI video pipeline.
Do you need a GPU for ComfyUI?
A GPU is highly recommended for practical use. CPU-only setups are much slower and limited to small images or simple tasks.

Comments 0
Be the first to comment on this post.